TWRP Recovery is available for Xiaomi Redmi Note 3. That means, we can enjoy various mods, custom roms, and other flashables by just installing the TWRP custom recovery on your Redmi device. But make sure are on the latest firmware and have confirmed your mobile model number. Apart from installing TWRP, Redmi Note 3 users can also gain root access by flashing the SuperSU file. Check below for download link, full steps and accompanying screenshots.

The following is the guide on how to install TWRP Recovery and root Redmi Note 3–
Prerequisites:
- Before stepping into the installation process, make sure you have backup all your important data. If not, backup from here.
- Charge Redmi Note 3 at least 70%.
- Make sure Mi USB Drivers are installed on your PC.
- Unlock Bootloader on Redmi Note 3
Download section:
Disclaimer: Install TWRP recovery and rooting Redmi Note 3 voids your company warranty. If doesn’t followed the steps correctly there is a chance that you may brick or damage your handset. Proceed at your own interest.
How to install TWRP Recovery on Redmi Note 3
Step 1: Download the above ADB zip package and extract the same to your computer using winrar or 7zip tool. You need to copy the recovery img file in the ADB extracted folder.
Step 2: Enable USB Debugging option from settings. If you’re enabling USB Debugging for the first time, then do check HERE.
Step 3: Now you need to connect the device with PC using a standard USB cable.
Step 4: Next you have to launch the ADB drivers file & you will see Redmi Note 3 as device name, just tap on Install, to install the required ADB Drivers.
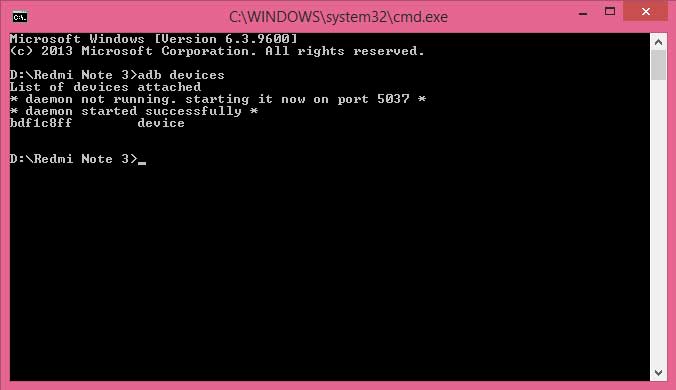
Step 5: Launch command.bat file from the ADB folder and give the first command to check whether the device is successfully connected to PC or not.
adb devices
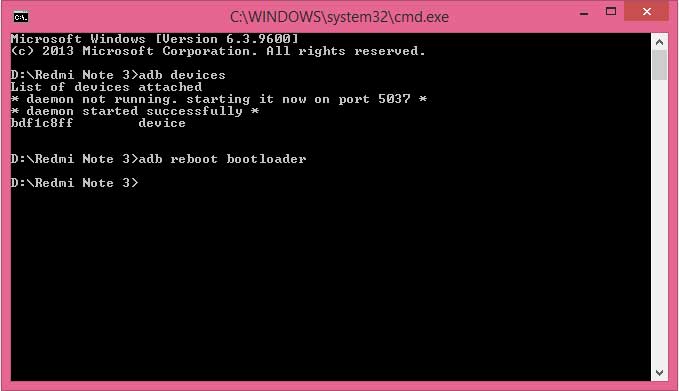
Step 6: Enter another command to reboot your device into bootloader:
adb reboot bootloader
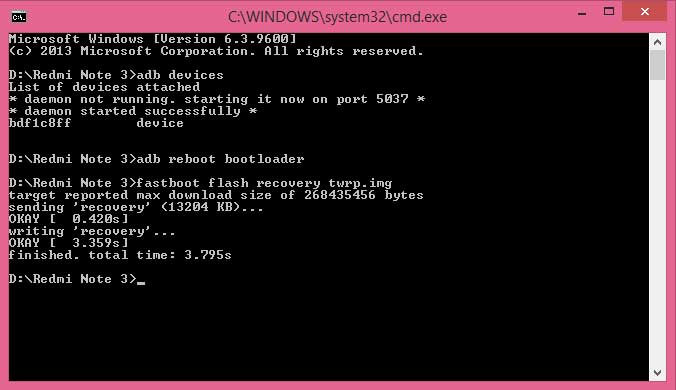
Step 7: Now in order to flash TWRP recovery, enter the below command:
Fastboot flash recovery twrp.img
Step 8: That’s it! You have successfully installed TWRP Recovery on your Xiaomi Redmi Note 3.
How to Root Xiaomi Redmi Note 3:
1. Download Super.zip file from the above download section and place it on your device SD storage.

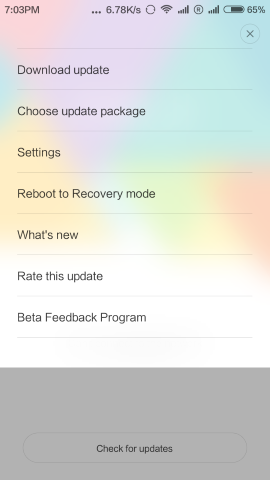
2. Now you need to boot the device into TWRP recovery. You can follow the below two steps to boot the device into custom recovery.
- Method 1: Go to Settings > Updater app > Click On three dots > Reboot to Recovery mode.
- Method 2: Power off your device and press & hold “Volume down + power” buttons.
3. Next tap on “Install” & locate the downloaded SuperSU.zip file from SD card. Swipe to install and there you go!
You have just rooted Redmi Note 3 via TWRP custom recovery. If you encounter any issues during executing the above process on your Xiaomi smartphone, do let us know by comment below. We will soon get back with most possible solutions.
Do share the article with your friends using the below social buttons and let them enjoy root access on their respective Redmi Note 3 phone.

This tutorial is for snapdragon version or the MTK one plz.