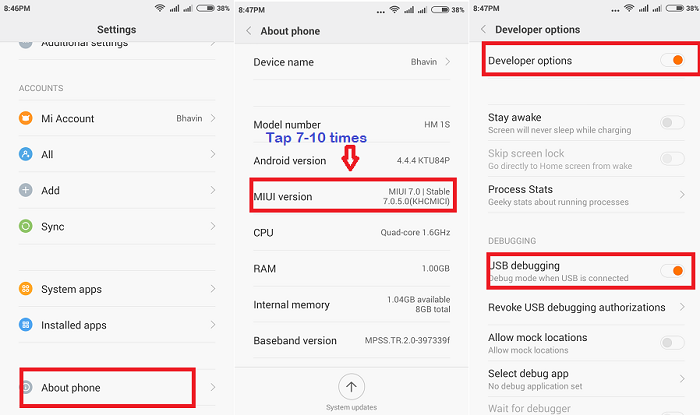
If you’re Android smartphone user, then you might be familiar with USB Debugging Mode. It is a special mode where you get much more freedom of control over your mobile. USB Debugging mode also plays a crucial role in facilitating a connection between your Xiaomi device & a computer with Android SDK. Users can also make system level changes on their Android mobile through giving terminal commands directly from PC. If you’re one among those who wanted to enable USB Debugging/ Developer options on your Xiaomi Redmi Note 4, then you’re at the right place. Without much ado, follow the below steps to switch-on USB Debugging mode on Redmi Note 4.
To remind you, Xiaomi Redmi Note 4 is the latest mid-range smartphone launched early this year in India starting for Rs. 9,999. It packs with several high-end specs like 5.5-inch Full HD display, powered by a 2GHz octa-core Qualcomm Snapdragon 625 processor, runs on MIUI 8 based on Marshmallow and sports a 13-megapixels rear camera (5-megapixels front camera). Also how to update Xiaomi Redmi Note 4 to Android 7.1.1 Nougat firmware via Lineage OS 14.1 ROM.
How to Enable Developer Options on Xiaomi Redmi Note 4:
1. Firstly, unlock your phone and go to main Settings on your Redmi device.
2. Scroll down and find About Device. Tap on it.
3. Locate MIUI version and tap on it about seven times.
That’s it! Now you’ll see a message “You’re now a developer” displayed on your device screen. To enable USB Debugging mode, read on the below steps.

Enable USB Debugging on Xiaomi Redmi Note 4:
1. Again, head back to main Settings.
2. Tap on Additional Settings.
3. Next, select Developer options.
4. Finally, you need to find USB Debugging option and enable it.
Now, you have successfully enabled USB Debugging mode on your Redmi Note 4 device. For any queries or issues, do feel free to contact us via below comments. You can also check our Redmi Note 4 section for all tips, tricks & update tutorials.

LEAVE A REPLY