When using your Xiaomi, Redmi, or POCO phone, capturing what’s displayed on your screen is essential for various purposes, such as saving important information or sharing interesting content with others. Knowing how to take a screenshot efficiently can greatly enhance your user experience.
In this guide, we will walk you through the different methods and features available on these devices to capture and manage screenshots easily.
How to take screenshots using a physical button on Xiaomi, Redmi, and POCO Mobile Phone
Pressing the Power and Volume Down Button Simultaneously
The easiest way to take a screenshot on Xiaomi phones, including Redmi and POCO models, is by using the physical Power and Volume buttons:
- Go to the screen you want to capture.
- Press and hold the Power and Volume Down buttons simultaneously for 1-2 seconds.
- Listen for the camera sound or look for the screen to flash.
- The screenshot will be saved and can be found in your Gallery or notifications.
Taking a Screenshot with the Physical Button on Xiaomi, Redmi & POCO
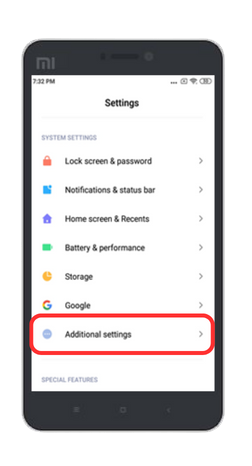
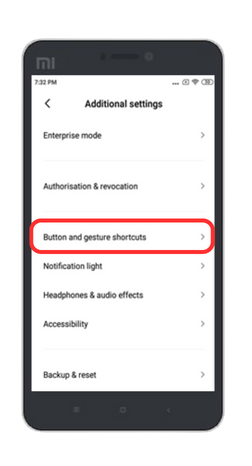
Some older Xiaomi and Redmi phone models, like the Redmi Note 3 and Redmi 4, have physical Home, Menu, and Back buttons at the bottom of the device. These buttons can be customized to take screenshots with just a tap.
To set this up on an older Xiaomi device:
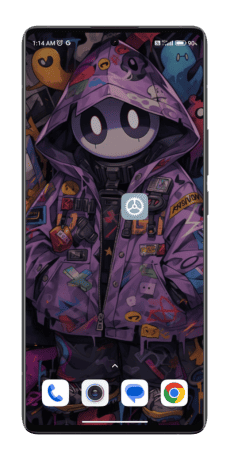
- Go to
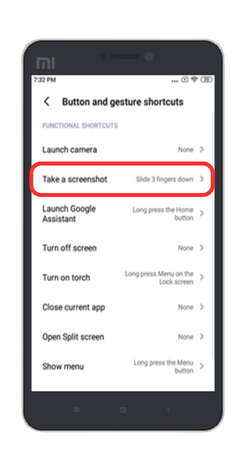
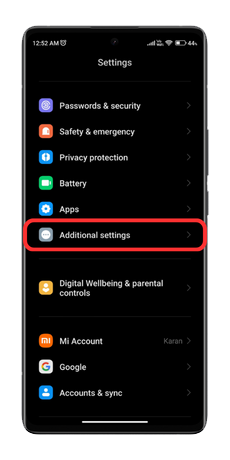
Settings > Additional Settings > Button and gesture shortcuts.
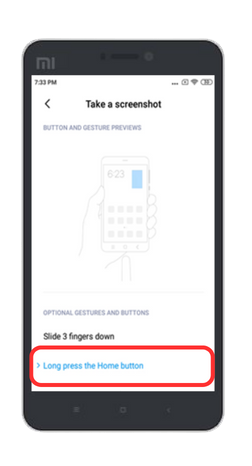
- Tap on the “Take screenshot” option.
- Choose which physical button you want to assign for screenshots, such as the Home button or Menu button.
- Tap OK to confirm.
After assigning the screenshot function to a physical button, you can now take screenshots on your older Xiaomi phone by long-pressing the chosen Home, Menu, or Back key.
Long-press the preset physical button for 1-2 seconds until you hear the camera shutter sound or see the screen flash, indicating the screenshot has been captured. It’s that easy to take screenshots using customized buttons on older Xiaomi devices!
Using the Screenshot Button to Capture Screenshots
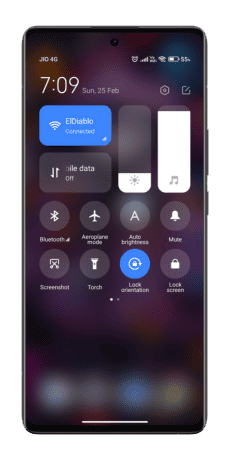
MIUI 8 and newer versions have quick toggle buttons in the notification shade, allowing easy access to key Xiaomi phone features. This includes a Screenshot button that provides a fast way to take screenshots.
- Go to the screen you want to capture.
- Swipe down from the top to open the Control Center.
- Tap the Screenshot icon.
- Select the type of screenshot you want (full, rectangular, or scrolling).
- Wait for the screenshot to be captured.
- Find the screenshot in your Gallery or Screenshots folder.
What Are the Different Ways to Take a Screenshot on Xiaomi, Redmi, and POCO devices
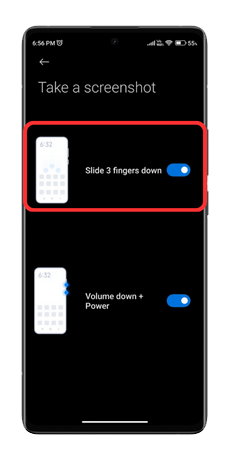
Utilizing the Three-Finger Swipe Gesture
Many Xiaomi, Redmi & POCO phones offer a handy three-finger swipe gesture that quickly takes screenshots without pressing buttons.
To enable the three-finger screenshot gesture:
- Go to
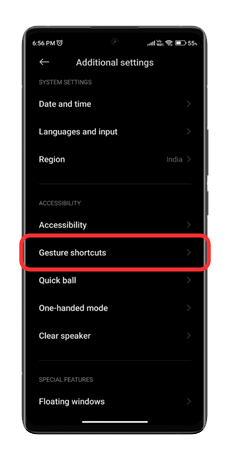
Settings > Additional Settings > Gestures Shortcuts > Three-finger screenshot.
- Toggle on the “Three-finger screenshot” option.
Taking a Screenshot with the Three-Finger Gesture:
- Go to the screen you want to capture a screenshot of.
- Using three fingers, swipe downwards on the screen in one motion.
- Your phone will immediately take a screenshot of the displayed screen.
- Find the captured screenshot in your Gallery or notifications.
If pressing multiple buttons is difficult, this gesture is an excellent alternative for quickly taking screenshot on Xiaomi devices. Simply swipe down with three fingers instead!
Taking a Screenshot on Xiaomi, Redmi & POCO using Quick Ball
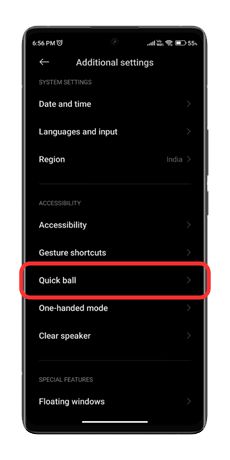
If you have the Quick Ball feature enabled on your Xiaomi, Redmi & POCO phone, you can use it as a handy shortcut for taking screenshots:
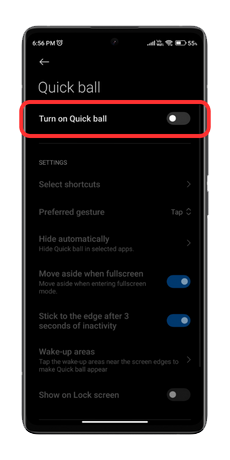
To enable the Quick Ball feature:
- Go to
Settings > Additional Settings > Quick Ball.
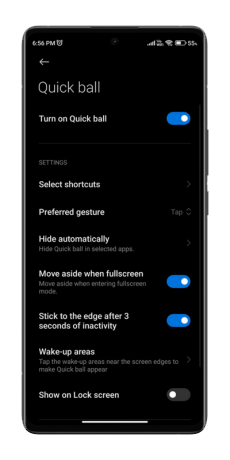
- Toggle the switch to turn on Quick Ball.
Taking a Screenshot with the Three-Finger Gesture:
- Drag the Quick Ball icon from the edge of the screen.
- Press and hold the Quick Ball icon for 1 second.
- Tap the “Screenshot” option from the Quick Ball menu.
- Your phone will instantly take a screenshot without needing any buttons.
The Quick Ball provides quick access to various phone functions. You can easily capture screens without gestures or hardware buttons by selecting the Screenshot option. It’s a convenient built-in shortcut for Xiaomi users!
How to take Scrolling or Long screenshots on Xiaomi, Redmi, and POCO Phones
Xiaomi devices have a useful scrolling screenshot feature that lets you capture entire web pages, documents, or app screens that extend beyond your display.
To take a long screenshot:
- Take a normal screenshot first using any method like the power + volume down buttons.
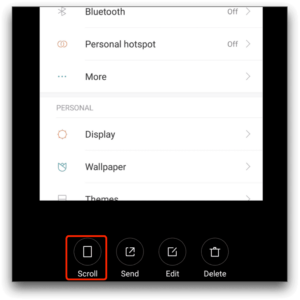
- A “Scroll” option will appear on the screenshot preview thumbnail. Tap on it.
- Your phone will automatically start scrolling and capturing screenshots bit-by-bit until you tap “Stop” or it reaches the end.
- The multiple screenshots will be stitched together into one long image.
How to Access your screenshots on Xiaomi, Redmi & POCO Devices
After taking a screenshot on your Xiaomi, Redmi, or POCO phone, you can easily find and view the captured image through either your device’s Gallery app or notification panel.
The Gallery app stores all your phone’s photos and videos, including screenshots. Open the app and look in the Screenshots album.
Screenshots also appear as small thumbnail previews in your notification panel shortly after being captured. Tap on the thumbnail to open the screenshot directly.
Whether using the Gallery or notifications, accessing your screenshots on a Xiaomi device is quick and simple.
FAQs
Can I take a screenshot on Xiaomi without the shutter sound?
Yes, you can. Simply turn off the “System sound” option in the settings before taking a screenshot.
How do I take a basic screenshot on my Xiaomi phone?
The easiest way is to press and hold the Power and Volume down buttons at the same time for 1-2 seconds until you hear the camera shutter sound.
Is there a gesture shortcut to take screenshots on Xiaomi devices?
Yes, you can enable a three-finger swipe gesture in your Xiaomi smartphones settings to screenshot by swiping down with three fingers.
Where can I find my screenshots after taking them on a Xiaomi phone?
Captured screenshots are automatically saved in your phone’s Gallery app and also visible in the notifications panel.
How do I take a scrolling or long screenshot on a Xiaomi phone?
First, take a regular screenshot, then tap the “Scroll” option in the preview to capture the entire page content by scrolling.
Can I edit or draw on my screenshots on a Xiaomi device?
Yes, Xiaomi’s built-in screenshot editors allow you to crop, doodle, annotate, or blur parts of a screenshot before sharing.
What is the quickest way to share a screenshot from my Xiaomi phone?
The screenshot preview that pops up after capturing one allows you to instantly share via messaging apps, social media, email, etc.
Conclusion
Thanks to the various built-in options, taking screenshots on Xiaomi devices is a breeze. Using simple button presses, customizable gestures, or quick toggle shortcuts, you can capture screens, long scrolls, selections, and more with just a few taps.
For optimal results, be sure to adjust your Xiaomi phone’s brightness, clean the display, hold it steady, and utilize the integrated editing tools.
With all the flexible screenshot capabilities, you’ll never miss an important image or piece of information again while using your Xiaomi, Redmi, or POCO smartphone. Just pick your preferred method and start screenshotting away!
I hope this guide was helpful and you were able to take a screenshot on Xiaomi, Redmi & POCO phones. If you are facing any issues in this regard, please let us know in the comment section, and we will try our best to help you out.
Also Read: How to Enable Developer Options and USB Debugging on Xiaomi, Redmi & POCO
If you’ve liked our article, please let us know in the comment section below.



Second option is what I was searching. Thanks a lot! I don’t understand how people think that pressing 2 buttons simultaneously is a good option for a screenshot. It’s uncomfortable and wears down the buttons.